It is so cold today here in New York...and for some reason the heat in the studio decided to blow cold air so I was freezing all day long,
have to get that fix pretty soon. That's when I thought why not make a winter theme cake ;) So for this blog I'll show you how to do the decorations for the cake. They are all edible and the good part is that they are rice crispies treats ! yum yum
have to get that fix pretty soon. That's when I thought why not make a winter theme cake ;) So for this blog I'll show you how to do the decorations for the cake. They are all edible and the good part is that they are rice crispies treats ! yum yum
You won't need much, they are very simple to make :
- Rice crispies treats.
- Black fondant.
- Brown fondant.
- Gold dust.
- Small ball tool.
- Flat tip modeling tool.
- Water & brush
The first thing is to shape our rice crispy. Make some rounds for the bells, some small cones for the acorns and some big cones for the pinecones.
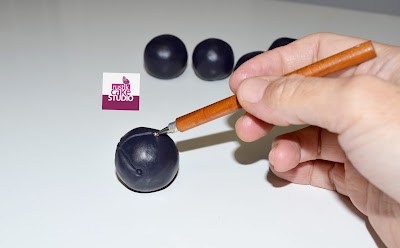
Lets start with the Bells. Apply a little water to the rice ball so that the fondant sticks to it. Use the black fondant to cover the ball.
With the flat tip modeling tool make 2 lines in X. Don't go all the way around. Just do it on one halve.
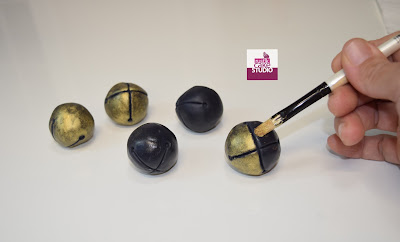
Now with the help of the small ball tool make circles right were the lines end.
To put some gold color I first rub some shortening on the ball and then I brushed it with the gold dust. Make sure you don't color inside the lines.
For the Acorns we will use the brown fondant. This cone you don't need to cover it all the way, you can leave the flat part with out covering for now.
With the flat tip tool make lines all around the cone.
For the top part of the acorns, make a ball with your hands and then flatten it just a bit. Then cover the flat side of the cone and with the pointy tool make lots of little holes.
For this acorns I dissolve the gold dust in a little bit of Vodka and painted them all around.
Sorry this post is kinda long, but Is like 3 in 1 ;)
Finally the Pinecones. They take more time but they look very nice at the end. You don't need to cover the entire big cone. Just cover the tiptop of the cone and then work your way around adding the scales.
And for the final step, use powder sugar to make them look very wintery with snow on top :) And now you can decorate your cake ! Enjoy !


Very nice tutorial - lots of good info in this 3 in 1. Thank you kindly for sharing it. Blessings!
ReplyDelete